Isadora + Processing + Kinect


[A]ura Video


A nice 3 minute video from Aura here, it’s a bit late – i’ve been rather busy!

[A]ura – WYSIWYG
What You See Is What You Get

A performance-gallery with open-source-choreography
One day the internet will be as sacred as a giant ancient cathedral. And everybody will sacrifice their details to pay tribute to the digital gods.
In the interactive performance (A)ura, the user is transformed from spectator, to creator: during the weeks before the premiere they can find a unique feature at ChoreoMixer, with which they can design and remix the choreography and contents of (A)ura, by using the browser.
Walter Benjamin says that in modern art the aura of the work of art withers because of mechanical reproduction, and inaccessibility, due to too close a proximity to the observer.
At the same time, a completely different aura of amazement will be created by new technologies. Every user can be a choreographer, an innovative remixer and in that way create his own virtual memorial which perhaps will follow its own unexpected ways. Closeness and distance will join crosswise in a new way.
But what about the situation when the digital medium refuses to cooperate with the user?
What you see is what you get.
choreography/dance: Elke Pichler
music/video: Alexander Nantschev
stagedesign/costumes: Monika Biegler
programming: Stefan Lechner
interactive technical support: Graham Thorne
legal consulting: Clemens Lahner
pr: Stefan Eigenthaler
camera: Philipp Aichinger
Kindly supported by:
MA7, Kosmostheater and Ars Electronica Center”

3D [Embodied] Uses NI-mate for tracking.


“3D [Embodied] is a mixed reality performance involving a virtual world as a platform to explore 3D immersive spatial virtual and physical displays. The performer ́s body interacts with the three dimensional space by the input of computer vision, skeleton tracking, and the output of 3D video mapping projection. Both video and audio rendering are generated in real time. Choreography by Yacov Sharir, sound design by Bruce Pennycook and technical support by Yago de Quay. Austin, 2013”

‘Reveal’ Report Part.2 [LUX – Helsinki]


If you haven’t already, please read Part 1 [HERE]

So, after about a year of planning I flew out to join Dan and two of his third year students from Guild Hall School of Drama (London) in Helsinki. The first thing that hit me was the weather; it took your breath away it was that cold. I arrived about 11:30,  after a beer I went straight to bed… but the next day we got up and went straight to the cabin.

THE CABIN

We had a porta-cabin upon which all the computer hardware was kept. (We where lucky as some people had tents!) And this was pretty much my view for the next 6 days…

Lots of coffee cups lying about!

AND IT BEGINS…

The first two days we had to set up, test and check the system. Then LUX was officially open and the public could all the pieces in full glory. Public viewing times where 4:00 PM until 10:00PM

We spent two days fine tuning and making the Isadora patch perfect. The sun went down about 3 so we had a short while to preview the images properly… this was from day one…

Sorry for image quality I was shaking holding my phone!

Day One

We attracted a lot of attention! So much so that people where blocking the pathway and filling up on the stairs in the image above!

People going about their daily business walking or cycling home had to stop and ask people to move out of the way. It was great to see so early on.

It became clear after only a few hours that children understood it straight away and some of the elder people took a little longer to figure out the concept and interaction. We found that a lot of people didn’t want to interact with the piece and just wanted to watch. But the flow of people made it work anyway. As people walked directly up to the cameras they soon realised that they where blocking the cameras and revealing more of the wall. We had a few dogs sniff the cameras and push buggies also looked good interacting with the wall images as they rolled by.

Some interesting observations for me including a guy swinging a white plastic bag around his head for about half an hour, a man and woman dancing like robots and a small child physically touching the wall and projected light thinking that it was somehow physically interactive.

The first night went really quick and some of the patches didn’t look as good as expected. But overall we where happy…. we then went for a beer and didn’t get home until 4 in the morning! The guys at sun effects looked after us and it was all networking (of course!).

TECHNICAL DIAGRAM

This is just a simple technical diagram to show the workflow.

It’s not the best diagram but it gives you an idea of the layout

Kinect for Windows.. Could this be it?!


I have been slightly bewildered as to why the Microsoft Kinect has not really been able to work with windows computers as easily as it has been with Apple Mac; especially in terms of plug-ins. One only has to ‘do a Google’ to see that the majority of software are mac only.

I guess its all down to the drivers and frameworks… (well over my head) but it still seems a bit strange.

The Xbox Kinect. Great for Mac.... its been a long wait for Windows users!

Anyway; many of the Isadora PC/Windows users have been slightly jealous of us apple lot as we’ve been playing around with Kinect sensors for well over a year now via Quartz Composer, Processing, Syphon, etc. But now it seems that there is a Winndows plugin!

The all important link is here:

http://vjfx.com/main/en/mmblog/mmblogintrinsicsrnd/item/64-freeframe-depthcam-plugins

I have not tested it and don’t actually have access to a windows machine right now. But it seems its easy to install and should be fine.

But note: Important: Download and use the 32bit versions of all files, since 64bit versions do not work with the plugins, this also goes for use on Windows 7 64bit!

Enjoy!

Motion Tracking in Isadora


This is more of a tutorial if anything. By the end of this post you will be able to (hopefully) create a basic motion tracking patch using Isadora. I am using Isadora (version 1.2.9.22) on a Mac.

1) Open up Isadora
2) Find and select the ‘video in watcher’ actor.
3) Open the Live Capture Settings from the Input Menu.

4) Click Scan for devices, then select the video source from the drop down list. I am going to use the built in iSight camera, you may use anything. Then click Start.


You should see a small preview at the bottom of this pop up window. Make sure you press start!

5) Go back to the first window and then find these actors:

Freeze
Effects Mixer
Eyes

You should have something like this on your screen:
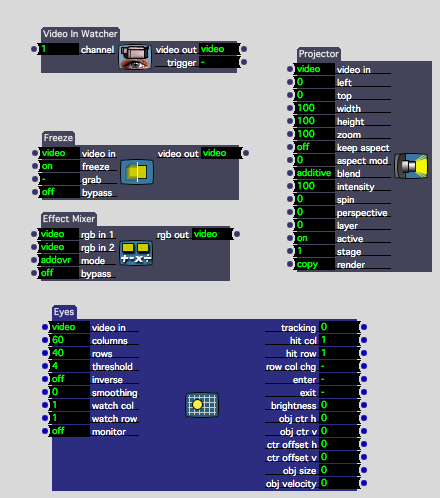
6) By clicking on the small dots (from left to right) connect the actors so that they appear as follows:

(note the projector is not currently being used)

7) In the effects mixer, change the mode to ‘Diff’, abbreviated to ‘Difference’

IMPORTANT: Notice how we are using two feeds from the video in watcher, one going to the Freeze actor and the other into the Effects Mixer Actor. This is so we can freeze a still picture, then compare it (or look at the ‘difference’) between it and the live feed. This gives us our data for motion tracking. We take the still image by clicking the ‘Grab’ on the Freeze actor:

MAKE SURE NOTHING, OR NO-ONE IS IN THE SHOT/FRAME WHEN CLICKING GRAB!
If not this will conflict with the data. This is the most common thing to go wrong!

8 ) Switch on the monitor for the Eyes actor by clicking and changing this button:

You should now see some black and white images with Red and Yellow boxes and lines.

The red lines correspond to X-Y, the horizontal and vertical points of the tracked image.
The yellow box outlines the biggest object in the shot, also giving out data in relation to the top left hand corner of the box.

9) It may help, just for experimenting, to join up the projector so you can see the live feed on screen, if not please skip this bit. Otherwise it should now look like this:

Go to Output and Show Stages to see this stage/output.

10) A few tips:

Turn on smoothing in the Eyes actor to smooth out values.

You can use the threshold in the Eyes actor to ignore/bypass and unwanted light/small objects in the frame.

You can inverse/invert the incoming video into Eyes if you are wanting to track darker objects, or sometimes it can just work better depending on the lighting and space.

Sometimes using a Gaussian Blur in between the output of the effects mixer and eyes can smooth out the video and make tracking a little easier.

11) Now play… there are endless possabilaties as to what you can do with this X+Y data, for this use these outputs:

If you have any questions, please contact me via this website of via the Isadora forum found here: You will find me under the alias of Skulpture.

Hope this helps, Enjoy Isadora and let me and the Isadora community know how you are getting along.